 in the left-most column of the row to expand the well and reveal the items available for download. Click the checkbox to the left of a specific item to download that item.
Wells with items are highlighted yellow when they have items relevant to the current tab. For example, a well with curves will be highlighted when displayed on the Digital Logs tab, a well with rasters will be highlighted when displayed on the Raster Logs tab, and so on. Click in the left-most column of the row to expand the well and reveal the items available for download. Click the checkbox to the left of a specific item to download that item.
With Quick Search, the list of items available for download under each well is only populated when you expand the well. In this way, the initial catalog is downloaded more quickly.
With LOGarc, only digital logs are available from IHS for Canada. Digital logs, raster logs, and well files are enabled for U.S. clients.
After selecting the desired items in the Search Results grid, specify which to retrieve, how to process LAS data, and the location where to save the downloaded files.
Save the processing options you define below to a retrieve profile that you can load so that you don't have to reconfigure settings every time or if multiple retrieve profiles have been defined, quickly switch between different processing options. Load retrieve profiles by selecting Tools ( ) > Load Retrieve Profile.
To select and retrieve logs
1. Do one of the following:
To select individual items one-by-one - click to the left of the Well Location row to display the individual items available for that well, and then click the checkbox to the left of the desired items to download.
To select all of the items beneath a well - click the checkbox to the left of the well name.
To select all items for all wells displayed in the Search Results grid - click Select All to the left of the Search Results grid.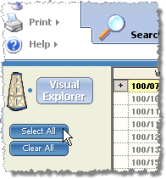
To clear the Search Results grid of all but the logs items currently selected, to the left of the Search Results grid in the curve constraints pane, select Selected data only.
When items are selected, the Retrieve Profile pane appears.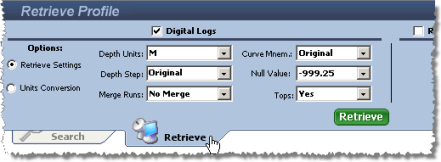
2. As various file types are selected for retrieval, corresponding check boxes on the Retrieval Profile pane are activated. Clear checkboxes to customize the retrieval.
3. Using the Retrieve Profile pane, select the Retrieve Settings and the Units Conversion radio buttons and specify the processing options.
4. Click the Retrieval Folder pane to launch a Browse for Folder window and navigate to the desired folder where to save your downloaded LAS files.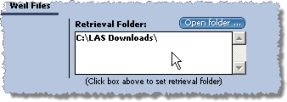
If you click Open folder, it actually opens the folder specified in the Retrieval Folders pane instead of giving you the option to browse for a different folder.
5. Click Retrieve.
Once the retrieval completes, the Retrieval Log dialog box appears.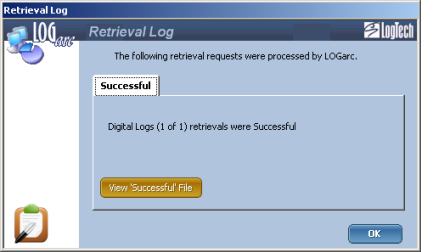
Click View Successful File to display details about the items retrieved.
6. Click OK to return to the main LOGarc window.
The items are saved in the Retrieval Folder specified above and the file name matches the UWI (for example, 100070106220W500.las). Where there are multiple las files for the same UWI, a number in parentheses is appended to the end of the file name but before the file extension as follows: 100070106220W500(1).las.
If both main pass and true vertical depth passes are downloaded, _TVD is appended to the end of the file name but before the file extension as follows: 100070106220W500_TVD.las.
| Changing Catalog Displays | Saving and Loading Retrieve Profiles |
| Filtering the Search Results Grid |